


ACTIVE™ – 2.3 Electric Pressure Washer
Price range: $749.90 through $1,199.90
- Load Voltage: 220-240V/50 Hz
- Rated Current: 10A
- Power Cord: 35 ft. / 10m 14 AWG
- Peak Pressure: 1500 PSI
- Working Pressure: 1100 PSI
- Water Flow: 2.3 GPM / 8.7 LPM
- Maximum Water Temperature: 104°F (40°C)
- Noise Levels: 91 dB @ 1m (on Active Wall Mount)
- No frame: 17.5 x 9 x 6 inches (444.5 x 228.6 x 152.4mm)
- Deadweight: 29 lbs (13kgs)
- Motor: 128 Induction
- Pump: Patented 5 Piston Reinforced Brass
- Switch: Rocker Switch
The Active 2.3 builds on the success of the Active 2.0, designed specifically for the professional consumer. Through continuous testing and incorporating valuable customer feedback. ACTIVE™ have developed a product that delivers the performance and design the market demands.
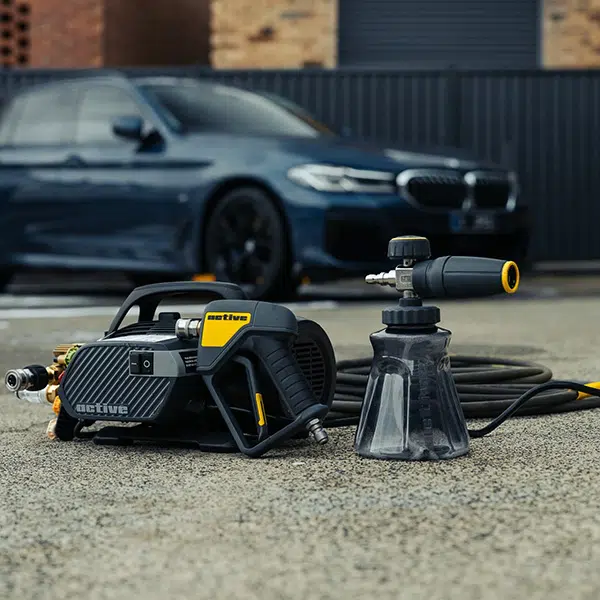
Equipped with an upgraded brass endplate 5-piston Pro Pump and a 128 induction motor, the 2.3 delivers 2.3 GPM at 1100 PSI. With a total output of 2,500 cleaning units, it makes any cleaning task effortless. This powerhouse is not only incredibly effective but also fully serviceable and rebuildable, ensuring long-term reliability.
Inclusions:
Machine Only
- Active 2.3 Pressure Washer
- 4 x nozzles (0,15,25,40) of orifice size 044 or 4.4
Complete Kit
- Active 2.3 Pressure Washer
- 4 x nozzles (0,15,25,40) of orifice size 044 or 4.4
- Active Premium Accessory Bundle
Important Notes:
- This unit is adapted to the 10A connections present in most homeowner garages and includes a 4.4 orifice size to help maintain current draw under 10A. Users are free to use other orifice sizes while making sure current draw doesn’t go above 10A, otherwise it can cause damage to the microswitch and capacitor.
- To ensure proper operation, steel-braided hoses are strongly recommended when using this unit.

How to Set Up, Operate, and Store the Active 2.3 Pressure Washer
- Attach the High-Pressure Hose:
- Locate the pump outlet on the unit, marked by a brass male threaded connector.
- Connect the hose by turning it clockwise on the pump outlet until hand-tight.
- Repeat this process on the spray gun, attaching the hose to the gun’s inlet.
- Connect the Water Supply:
- Locate the water inlet on the unit, marked by a female brass connector.
- Attach your garden hose, ensuring it is securely connected and hand-tightened.
- Turn on the water supply before activating the unit to prevent pump damage.
- Prepare the Spray Gun and Tip:
- Connect the metal wand to the spray gun by turning it counterclockwise until tight.
- Select your desired spray tip, slide back the wand’s collar, insert the tip, and release the collar to lock it in place.
- Power Supply Connection: Plug in the unit, press the GFCI’s test button, then the reset button to activate the GFCI safety feature.
- Purge Air from Lines: With the unit off, release the trigger lock, squeeze the trigger until a steady stream flows, then switch the unit on.
- Start Cleaning: With TSS (Total Stop System), the motor automatically stops when the trigger is released, ensuring energy efficiency and motor longevity.
- Switching Spray Tips: Engage the safety lock, remove the current tip, insert the new one, and disengage the safety lock to continue cleaning.
- Connecting a Foam Cannon: Remove the current nozzle, fill the foam cannon bottle with detergent, attach it to the wand, and apply the detergent to dry surfaces for maximum cleaning power. Rinse the cannon with clean water after use.
- Shut Down the Unit: Turn off the water supply, pull the trigger to release pressure, switch the unit off, unplug, and engage the gun’s safety lock.
- Disconnect and Store Components: Detach the hoses, wand, and gun, and store all parts in a cool, dry location.
If you live in a region where temperatures drop below freezing, it’s essential to winterize your pressure washer to prevent internal damage caused by freezing water. Here’s how:
- Antifreeze Canister Method:
- Connect the antifreeze canister to the unit’s inlet adapter.
- Press the canister button until fluid exits the pressure hose, then disconnect the hose.
- Manual Method (if no antifreeze):
- Disconnect all water connections, turn the unit on briefly to expel remaining water, then power it off immediately.
- Store the unit in a room above freezing, away from heat sources that could dry out seals.
With proper setup, operation, and maintenance, your Active 2.3 Pressure Washer will serve you well for years to come. Happy cleaning!
| Weight | 15 kg |
|---|---|
| Dimensions | 52 × 35 × 30 cm |
| Options | Machine Only, Complete Kit |
Be the first to review “ACTIVE™ – 2.3 Electric Pressure Washer”
You must be logged in to post a review.
Related products


Reviews
There are no reviews yet.